

The ZEN is a home thermostat that looks beautiful on your wall, is incredibly simple to use and can be connected to a home automation system so you can you can control the temperature of your home from anywhere.
It has an elegant touch screen display which is simple and intuitive and fades into the background when you’re not using it. Instead of screws, ZEN uses magnets to click on and off the wall.
We looked at how people use thermostats and we found that complicated units with embedded learning algorithms don’t really work the way people expect. You can spend a lot of time correcting the assumptions it’s made about you. We wanted to avoid this. We didn’t want to create a thermostat that thinks it’s smarter than you. We wanted you to only interact with ZEN when you really need to.
We have created a simple, easy to follow online guide to assist you with your installation. The ZEN online installation guide (www.zenthermostat.com/install) should be the first point of call for any installation. It provides step-by-step instructions for installing and configuring ZEN, which are customised to the specific wiring of your home’s heating and cooling system.
The ZEN thermostat has been designed to work best as part of a Home Automation system. ZEN utilises existing Home Automation systems to use scheduling and presets. To check compatibility with your current system please check the related FAQ item. However if you just want a beautiful thermostat you can use your new ZEN thermostat the same way you use your existing one.
Each ZEN Thermostat comes with a paper quick start guide in the box. You can download an electronic version of it here.
We have created a simple, easy to follow online guide to assist you with your installation. The ZEN online installation guide (www.zenthermostat.com/install) should be the first point of call for any installation. It provides step-by-step instructions for installing and configuring ZEN, which are customised to the specific wiring of your home’s heating and cooling system.
In most regions a professional installer is not required to setup your ZEN thermostat, however it is recommended. Before checking anything on your current system ensure that the mains power breaker is turned OFF.
The ZEN thermostat is only compatible with low voltage systems, rated to 24VAC. The ZEN thermostat will not work as a replacement for mains voltage thermostats which are typically 110-240VAC. If you are unsure about your type of system or suspect that it may be rated at 110 volts or higher, do not attempt to install your ZEN thermostat and contact a HVAC professional to assist with your installation.
If you are unsure about your type of system or suspect that it may be rated at 110 volts or higher, do not attempt to install your ZEN thermostat and contact a HVAC professional to assist with your installation
The ZEN thermostat is only compatible with low voltage systems, rated to 24VAC. The ZEN thermostat will not work as a replacement for mains voltage thermostats which are typically 110-240VAC. If you are unsure about your type of system or suspect that it may be rated at 110 volts or higher, do not attempt to install your ZEN thermostat and contact a HVAC professional to assist with your installation.
Most times the thermostat will simply unclip from its wall-plate with a light to moderate pressure. There may also be small screws holding it to the wall. If you are unable to remove your old thermostat, please refer to the user manual or manufacturer’s website.
Yes, the packaging contained with your ZEN thermostat is recyclable. If your old thermostat contains mercury, be environmentally conscious and do not place it in the trash. Instead, contact the Thermostat Recycling Corporation
ZEN uses the wiring configuration on your existing thermostat to determine what type of heating/cooling system you currently have. We use this to generate a configuration code which will make sure your ZEN will be able to control the temperature of your home.
There is no standard wiring guide for home thermostats. Each of the wires should be installed next to a terminal marked with a letter. This letter will determine your systems function and can be installed to the matched terminal on the ZEN thermostat wall plate.
If your terminals are not labelled with letters, you can follow the wires and colors back to your heating/cooling system to determine their function.
Not necessarily. Many thermostats use different lettering to mark wiring terminals and the ZEN thermostat installation guides provides a list of the most common labels. Please ensure that you have clicked the “Show more wires” button in the first section of the online installation guide.
Disconnecting the wires from the existing thermostat may require a screwdriver to undo the terminals.
Once removed, it is important to check that the wires are in good condition so that they make good electrical contact.
Check wires have between 5/16 - 3/8in (8-10mm) exposed core. If they don’t, you may need to cut and re-strip them

If the installation guide has specificied that some wires should not be connected, ensure that they are properly insulated.
Yes. The ZEN thermostat has an additional wall plate that can installed behind the thermostat to cover any larger wire installation or screw holes. The cover-plate can be used in portrait or landscape orientation and it is sandwiched between the wall and the ZEN wall-plate using the mounting hardware supplied in the box.
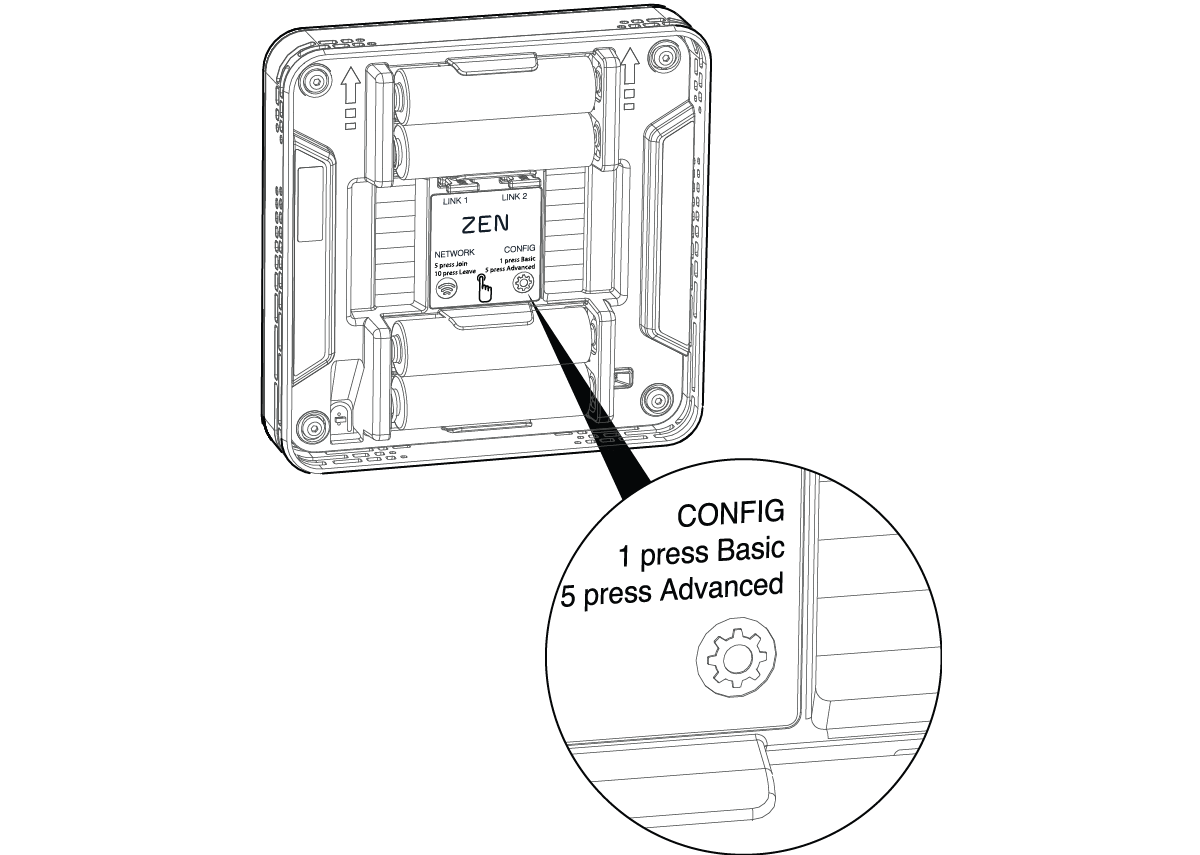
The links are used to connect some of the common circuits of your ZEN thermostat together. They are found on the rear of the device and can be seen in the figure below:
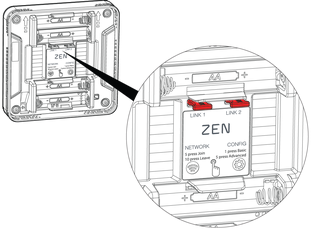
Configuration of the links is based on the information entered into the online install guide . When you input your existing wiring configuration the installation website will guide you on which links to use.
ZEN has 4 AA batteries which keep it powered. In typical usage patterns the ZEN thermostat’s batteries will last approximately two years. Do not mix rechargeable/non rechargeable batteries.
ZEN does need 4 AA batteries installed in the display at all times. However, if you have a “C” wire in place on your current system, this will power the system indefinitely and you won’t need to replace the batteries. If you don’t have a C wire, the 4 AA batteries will keep ZEN powered for approximately two years.
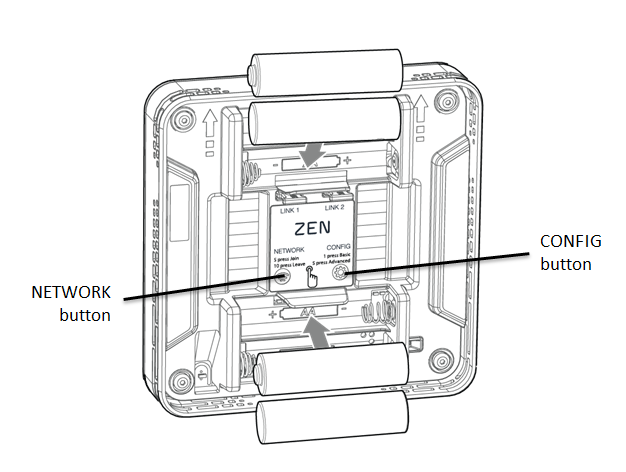
The network and configuration buttons are found on the rear of the display as seen in the figure below.
To setup your configuration code you must first go the installation website (www.zenthermostat.com/install) and identify your existing heating and cooling system wiring to determine your configuration code. Once you know your code, pull your ZEN display from the wall and press the CONFIG button on the rear of the display. The display will change to say “CONF” and you can input your configuration code by using the up or down arrows. Once you have set your code, centre touch the display to lock in the configuration. The code will flash once to confirm your selection.
The configuration code is a 3 digit alpha-numeric code. Each digit has a distinct function:
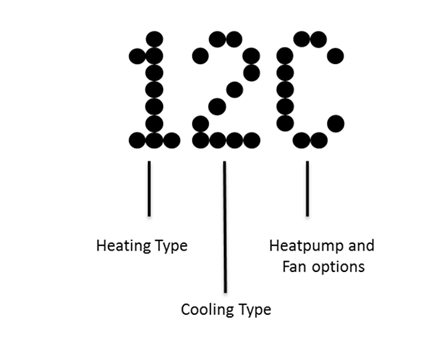
The configuration code is based on the following items entered by the user:
- Wiring of the old thermostat
- Type of heating system
ZEN is compatible with a wide range of different heating and cooling systems, in order for the system to function correctly, the ZEN needs to know what type of heating or cooling system you have in your home. The configuration code will setup your ZEN to work perfectly with the system you have.
The ZEN Online Installation Guide works for over 90% of install situations. However, if a wiring combination is not recognised, you will have been notified with a message like this:
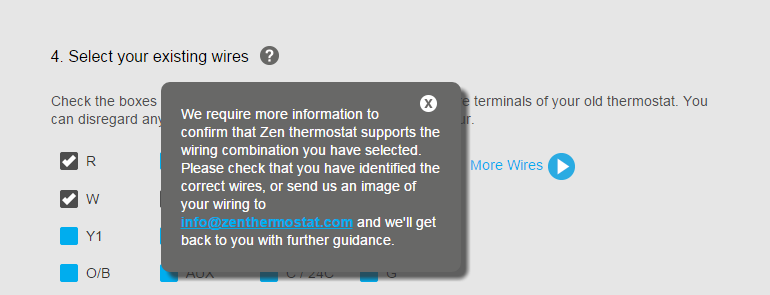
The next step is to contact support via email. Taking a picture of your existing wiring and attaching it to the email will be very helpful.
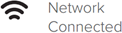
The ZEN thermostat will indicate if it is connected to a home automation system by Network icon on the front of the device. If the network icon is flashing, the ZEN is trying to find your network. The network icon will be solid when you are connected to your network.

In order to connect to a Home Automation (HA) system, open a connection to your current hub by following the instructions provided by your HA system provider. Once this connection is open, pull the ZEN display off the wall and press the “Network” button on the rear of the display five times. You should see the network icon flashing on the front of the display; this will indicate that your ZEN thermostat is attempting to connect to a network.
Once connected, the network icon will stop flashing and stay illuminated.
To disconnect your ZEN thermostat from a network, pull the display off the wall and press the network button on the rear of the display ten times. You should hear a beep on the tenth press. You should see that the network icon on the front of the display is no longer be illuminated.
Currently ZEN is compatible with heating and cooling systems in the following countries:
- United States
- Canada
- Australia
- New Zealand
In the USA and Canada, most residential systems are low voltage (24V).
In Australia and New Zealand there is a larger proportion of mains powered (110 or 240V) or digitally controlled thermostats. It is recommended in these regions that you get a professional to assess your current system.
The ZEN thermostat uses ZigBee HA 1.2 for communicating to existing home automation platforms. ZEN is tested to work with SwannOne and OpenHome certified platforms which means ZEN will work with the Icontrol platform used by leading US retailers and cable providers. We are also working to add compatibility with other platforms, including Apple Homekit, SmartThings and many others.
Yes, if you just want a beautiful thermostat you can use your new ZEN thermostat the same way you use your existing one. You won’t be able to set schedules or use energy saving features as these are driven by the HA system.
Please refer to the compatibility section to find the most up to date compatibility list.
Please refer to the compatibility section to find the most up to date compatibility list.
ZEN works closely with our supported Home Automation platform providers to ensure the thermostat software is regularly updated with new features and bug fixes. The ZEN software can be upgraded wirelessly by an Over-The-Air (OTA) upgrade. These OTA upgrades will usually be supplied by your Home Automation system provider.
To see the software version ZEN is running, pull the display off the wall, touch the centre to enter PREFS and then scroll right until you see the INFO menu. Then scroll down to see the software version. It should be a 3 digit number with a decimal point (e.g 1.01)
The INFO menu also shows what configuration code you have set. It should be 3 digits, 2 numbers and a letter (e.g. 12A)
To see the configuration code that you have set, pull the display off the wall, touch the centre to enter PREFS and then scroll right until you see the INFO menu. Then scroll down to see the configuration code. It should be 3 digits, 2 numbers and a letter (e.g. 12A).
The INFO menu also shows the version of software that ZEN is running. It should be a 3 digit number with a decimal point (e.g 1.01).
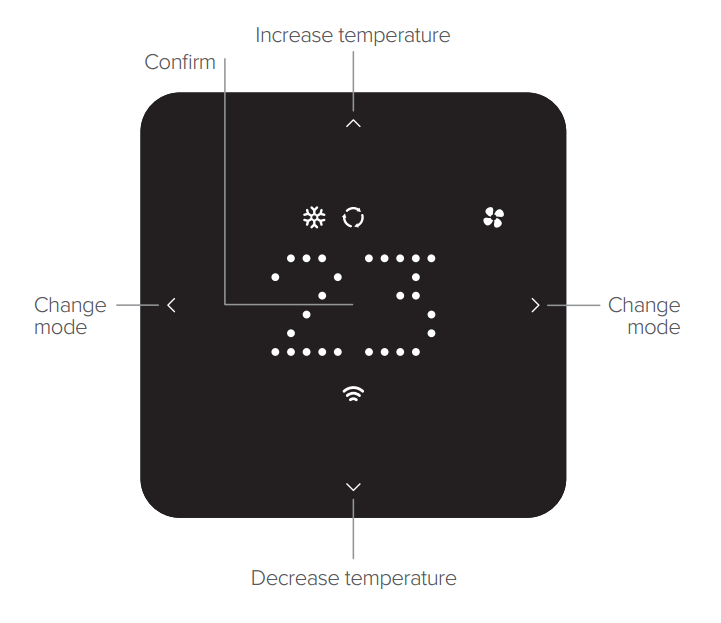
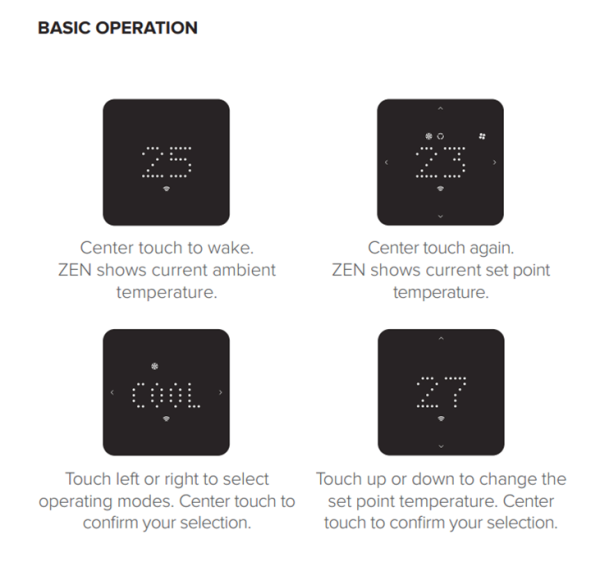
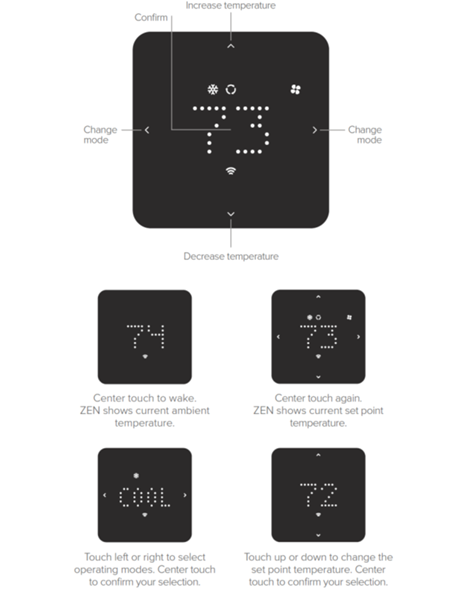
ZEN thermostat is controlled by touching the display.
The ZEN thermostat has five touch points to navigate through the menus. The centre touch point is used to wake up the device. The left and right touch points are used to navigate through menus, and the up and down touch pints are used to change the setpoint of menu settings. Centre touch also confirms any selection.
The ZEN thermostat displays turns off when you aren’t interacting with it. ZEN does this because our philosophy is that connected home devices should blend into the background of your home when you don’t need them. This approach also helps the ZEN maintain a long battery life.
Even when the display is off, ZEN keeps controlling your heating and cooling, and you have full control via your HA system.
To check if your ZEN thermostat is operating, wake it up by using the centre touch point. Once ZEN is awake, you can use icons to see if the system is running or not. The ACTIVE icon indicates that the system is running, the various MODE icons (heating, cooling ETC) indicate what operating mode is currently in use.
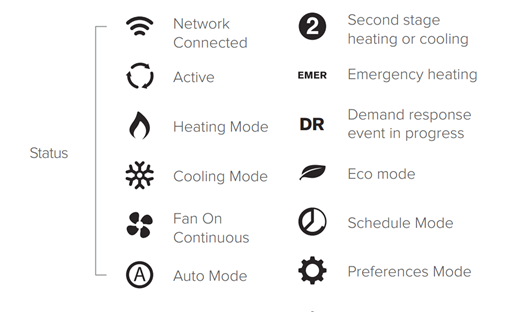
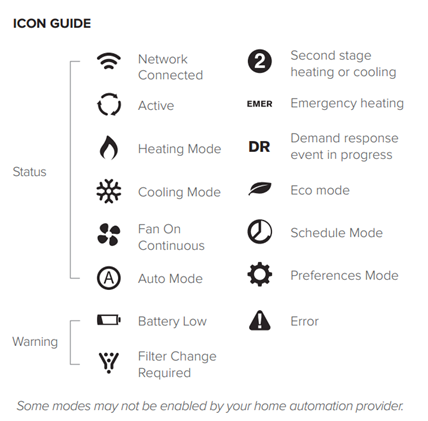
There are two sets of icons on the ZEN thermostat, the upper rows indicate which HVAC mode is currently in use and the lower set of icons are used for current status and warnings. The description of the icons can be seen in the following image:
You can use your Home Automation system to set a schedule or presets for ZEN thermostat. See the related FAQ on HA system compatibility.
If you would like to do a reset of the device but retain your configuration settings, simply remove the thermostat from the wall pull out one of the batteries, wait a few seconds and replace it.
You can also do a full factory reset, which will delete all your configuration settings and your network connectivity. In order to do this, you need to remove the device from the wall and press the CONFG button 20 times.
Performing a Factory Reset will reset your HVAC system configuration and all of your preference and advanced settings changes. You should only do this when instructed by a support centre assistant.
To restore to factory settings, pull the display off the wall and press the CONFIG button on the rear of the display 20 times. The display will beep five times to confirm the reset.
If you do a Factory Reset, make sure that you set your configuration code and preferences back to their original values before replacing the display on the wall.
To enter the preferences menu, pull the display off the wall, the centre touch to enter PREFS. There are three preferences available to change, the language (English, Spanish and French), temperature units (degC or degF) and the brightness of the display.
ZEN Thermostat supports setting the following operating modes via the thermostat display:
- HEAT, COOL, OFF, EMER (emergency heat)
- FAN AUTO (your HVAC system controls the fan) or FAN ON (fan on at all times)
- AUTO (not available by default, must be enabled in advanced settings)
The ZEN user interface automatically adjusts to only show the operating modes that are available for the wiring and HVAC configuration.
Other functions such as scheduling, economy modes or demand response are controlled through the home automation platform using a touchscreen or smartphone app.
Advanced configuration allows a professional HVAC installer to set more detailed system parameters. Any changes made in the advanced configuration will override basic configuration settings, so it recommended that only a knowledgeable HVAC installer use the advanced settings.
The available advanced settings can be accessed by the link shown at the end if the online configuration process at www.zenthermostat.com/install.
- Complete the online configuration process at www.zenthermostat.com./install.
- At the end of the process, click on the link to the “Advanced Setting” page.
- Use the tabs and dropdown boxes to select the advanced preferences you would like on your thermostat. You will see that the sequences of codes shown at the bottom of the guide changes as you change preferences.
- Once you are happy with the advanced settings, , pull the your ZEN display off the wall and press the CONFIG button on the rear of the display five times. After a short delay your thermostat will enter the advanced menu.
- Use the left and right controls on the display to scroll through the advanced config codes and the up and down controls to change the number value for each code. Make sure you touch the centre for each code to confirm your selection.
- Once done, place the display back on the wall.
The available advanced settings will change depending on what heating and or cooling system you have in your home. After completing the installation guide, only the useable advanced settings will be displayed by the online Advanced Settings page and on the ZEN display.
If you detach the ZEN Thermostat display from the wall plate, the heating or cooling will turn off. The relays which change the state of your heating/cooling system are all held in the display. In order to reactivate the heating/cooling you simply put the display back on the wall.
You may set your thermostat to 70°F/21ºC, but find that it’s 69°F/20.5ºC inside and the heat isn't turning on. The ZEN thermostat is designed to control temperature within a range of +/- 1.5 F, which is common to most thermostats and is done to ensure that your heating or cooling equipment isn’t overstressed which may reduce its lifetime.
This ZEN thermostat is battery powered and uses 4 x AA alkaline batteries which are located at the rear of the display. Remove your ZEN thermostat from the wall and replace these batteries. Ensure the battery contacts are clean and there is no dirt or oxidisation on the contacts. If there is any oxidation, use an electrical contact cleaner and gently clean the battery terminals. Do not spray the contact cleaner directly on the thermostat rather spray it on a cloth and then wipe the terminals with the cloth.
If your heating and cooling functions with a heat pump system and it blows in warm air when the ZEN thermostat is set to “cool” mode (the “cool” or “snow flake” icon is on), you may need to reverse the functionality of the heat pump O/B wire. In order to change the setting on the O/B wire, repeat the configuration process, this time selecting the opposite wire to your last choice (O instead of B or B instead of O).
If your heating and cooling functions with a heat pump system and it blows in cool air when the ZEN thermostat is set to “heat” mode (the “heat” or “flame” icon is on), you may need to reverse the functionality of the heat pump O/B wire. In order to change the setting on the O/B wire, repeat the configuration process, this time selecting the opposite wire to your last choice (O instead of B or B instead of O).
When you first receive your ZEN thermostat, there is no configuration loaded onto your device and the display will show “ZEN”. In order to get your ZEN working, please visit the online installation guide at www.zenthermostat.com/install and configure your device.
If you expect that your heating or cooling system isn’t working, the first thing to check is whether the ZEN thermostat is active. This can be seen if the ACTIVE icon is flashing.
If the icon isn’t flashing, here are some things to check:
- ZEN is set to the desired mode (HEAT or COOL). You should see the corresponding HEAT or COOL icon illuminate on the ZEN display to confirm this
- The setpoint is at least 1.5 degrees F higher (for heating) or lower (for cooling) than the ambient temperature
- Thermostats operate by switching your heating and cooling system on and off. It may take 10 or 15 minutes before your system is switched on again, so keep an eye on it for a short period to confirm it still isn’t operating.
If you have checked all of the items above, you can perform a reset of the ZEN thermostat by removing the display from the wall and pulling out one of the batteries, waiting a few seconds and then replacing it.
If your ZEN thermostat indicates that it is ACTIVE but your heating or cooling system is not working, here are some things to check.
Firstly you should check whether you have good contact between the wires and the ZEN terminals. Remove your ZEN thermostat display from your wall and ensure that all wires are in the correct location. Next pull on your wires to ensure that they are inserted correctly. If the wires are inserted correctly you can check to make sure that you have enough exposed wire, it should have between 5/16 - 3/8in (8-10mm) exposed core. If they do not, cut and re-strip the wires and re-insert them into the appropriate connector.
If the wiring appears to have good contact with the ZEN terminals, try resetting the ZEN thermostat by removing the display from the wall and pulling out one of the batteries, waiting a few seconds and then replacing it.
If after these checks you still have a problem, it is most likely something to do with your HVAC system and you should contact an HVAC specialist to diagnose the problem.
If your ZEN does not look like it is sitting flat on the wall, you can check that the wiring bundle is not interfering with the device and pushing it away from the wall. If the wires are interfering with the fitment of your device, you can try pushing some of the excess wire back into the wall cavity.
You can also check to make sure that the surface you mounted your device on is not flat. If you are still having trouble you can also try using the provided backing plate which may assist in getting your ZEN nice and flat on the wall.
If you have a lot of wires you can try feeding as much of the excess wire back into the wall cavity. Leaving the minimal amount of wire required for a good connection will help you to keep the installation tidy.
If your thermostat is not behaving as expected or the touch is unresponsive, you can perform a reset on the device. Simply remove the thermostat from the wall, pull out one of the batteries, wait a few seconds and replace it.
The ZEN thermostat contains a precision temperature sensor and should not need to be adjusted. However if you would like to offset the temperature as seen on the display, remove the device from the wall and press the CONFIG button five times to enter the advanced menu screen. Once you are in the advanced menu, navigate using the right arrow until you see T0 appear. You can now adjust the offset up or down by the number of degrees you require. Once you have selected this, press the centre of the device to confirm your selection and your thermostat should blink to confirm your selection. Return your thermostat to the wall and your adjustment will be saved to the device.
(Future) jump to config code already set in install guide
The ZEN user interface automatically adjusts to only show the operating modes that are available for the wiring and HVAC configuration. Check that you have set the correct configuration code provided in our online install guide.